Monday, August 5, 2013

Please Ignore the Dust

Please excuse the mess while I revamp the blog and learn a little (ahem, a lot) about HTML and whatever the heck I'm trying to do here.

And this is how I feel about that:
Untitled

But seriously, my goal is to provide more valuable and organized content for my fellow stitchers and fabriholics.

And also, today is the first day of school (cue the fireworks and champagne cork popping!):

Untitled

Beloved Middle Child in 4th grade, Precious Princess in 1st grade, and Responsible Oldest in 5th.

I hope your day was as enjoyable as mine was LOL.

The blog should be good as new in about a week!

Friday, July 12, 2013

Several Small Finishes

I know many of you have mentioned this but being active on Instagram makes blogging sometimes seem redundant.  If you follow me on IG you've probably seen all of these, but I wanted to blog them anyway.

First of all, I have been loving Anna from Noodlehead's Open Wide Pouch tutorial.  This is a generously free tutorial offered in multiple sizes.  I even ordered some laminate fabric to line some pouches for leaky toiletries.

The first one is made with a hippo fabric in more of a home dec weight which meant that I didn't use interfacing.  I should have.  The bag is a little too floppy still.  It is lined with Nicey Jane laminated fabric (Nicey Jane is my all-time most hoarded fabric).  I had trouble with the zipper installation on this one.  For some reason I took this pic before adding the zipper pull fabric too.  Oh well. 

Open Wide Pouch pattern by Noodlehead

The next one uses the most adorable Michael Miller Prom fabric which I always call "Girl Spiking the Punch" fabric.  It is lined in a purple tiny dot fabric from my stash.

Open Wide Pouch pattern by Noodlehead


Open Wide Pouch pattern by Noodlehead

The next one uses a combination of Flea Market Fancy and orange tonal chevron.  Sorry for the awful lighting.  I finish projects at night and can't wait to take pics!

Open Wide Pouch pattern by Noodlehead

I also made one of Anna's Divided Baskets which is the perfect size for many things including two rows of pattern packets.  Right now I have my Fat Quarter Shop BOM pattern packets on one side and my Simplicity patterns on the other.

Divided Basket pattern by Noodlehead

Finally with the Anna Noodlehead love, I made another 241 Tote.  This one was for my sister Carrie:

241 Tote pattern by Noodlehead


I also made a hippo from McCall's M6484 pattern.  This is the small size.  The large must be huge!

Stuart the Girly Hippo.

His name is Stuart the Girly Hippo thanks to my IG friends :-)

Inspired by Terri at Sew Fantastic and using the Zip Pocket Pouch pattern from Michelle Patterns, I made myself a little elephant clutch for vacation:

Zipper pouch using Michelle Patterns pattern

Finally, I fell in love with Amanda Jean Nyberg's Thread Catcher pattern and made some cute little buckets.  These go together very quickly and are a great way to show off those fabric pairings that just call out from your stash to be together:

Crazymomquilts Thread Catchers.  LOVE this pattern.

Thread catcher pattern by Crazymomquilts


I made my mom one for her needlepoint thread bits:

Thread catcher pattern by Crazymomquilts


And when you make your mom a thread catcher, she's going to want a mug rug to go with it:

Matching mug rug for Mom

Thanks for making it through the photo gallery today!  For more photos of what I'm up to at the sewing machine, be sure to follow me on Instagram

Tuesday, July 9, 2013

Salt Water Sailing

My sister Jenny is a South Carolina girl who grew up knowing that she wanted to live at the beach.  Unfortunately, the man she fell in love with is a die-hard Minnesotan!  She has a wonderful loving family who make it worth the sacrifice, but she still longs for her yearly vacation to the beach in the summer.  This summer, in celebration of our dad's 70th birthday, we planned a big family trip to the beach.  I knew I wanted to be able to give Jenny a bed-sized quilt and present it to her in person during our trip.

When searching for a quilt pattern to make for Jenny, I immediately fell in love with the Missouri Star Quilt Company's Sailboat block tutorial (presented by another Jenny!).  She has always loved to sail and even took a hard-core Outward Bound sailing trip when she was in high school.  I have many memories of being deliberately capsized on our family's Sunfish sailboat when we were growing up.  She thought it was hilarious.  I thought big sisters were monsters.

The Missouri Star Quilt Co tutorial was made using Tula Pink's Salt Water fabric line.  Light, airy and nautical, this collection was an obvious choice for a summer bed quilt to go in Jenny and Jeff's gray bedroom.

Sailboat quilt for Jenny


For the backing, I had some left-over layer cake squares paired with Moda Bella solid in Seafoam.


Sailboat quilt back


Here is a closer look:


Sailboats up-close


The quilt is now in its new home in Rosemount, MN, with Jenny, Jeff, and my three nephews.  I hope it gives Jenny sweet dreamy memories of warm sandy beaches, cool ocean spray over the bow and the gentle pings of rigging in the wind.  I, on the other hand, will always hear the harsh bark of "JIBE-HO" before being dumped unceremoniously into the bay.

Tuesday, February 12, 2013

New Finishes!

Here are a few finishes from the last few months:


Drunkard's Path pattern called Ornate by Christina at SometimesCrafter


Fabric Buckets from a tutorial by Ashley at FilmInTheFridge.


Crazy baggy zipper pouch created from my own craziness for my friend LizInProgress.


Layer cake quilt using the tutorial 1+2 Easy Quilt Pattern by Samelia's Mum.


A minky doll quilt with matching pillow for a last-minute girl gift.


A Noodlehead 241 Tote for my sister Jenny's Christmas gift.


A Turning Twenty quilt for my sister Carrie's Christmas gift.


A Jewelry Book for my sister Carrie's birthday gift.
 
 
Most wonderful cutting table ever.  Using Cubeicals from Target & top from Ikea.


A total of six flannel holiday pillowcases for nephews, charity and friends.


ScrappyTripAlong quilt inspired by #scrappytripalong on Instagram.


Pezzy Quilt top based on the ones done by Crazymomquilts and Tinkerfrog.
 
.


Madrona Road MQG Challenge Quilt.


Repro fabrics Dresden Plate quilt top.  Still needs borders.
 
Ok, so there is the round-up from October through January.  Quick eye-candy that you've seen already if you follow me on Instagram.  Sometimes I feel really lazy so putting the finishes together in one place helps me realize just how much I've accomplished!  In addition to these, I also made bee blocks, quilted client quilts for holiday deadlines, folded laundry, ordered a new refigerator door handle, re-programmed the garage remote, did the dishes, cooked a few meals or a thousand, took kids to karate, swimming, chess, and the eye glasses place to replace broken frames.  Twice.  Fed the dog, cleaned up eaten Barbies, cleaned up colorful dog poop, cleaned up more eaten Barbies, and signed the dog up for Boot Camp.  Etc.  You know the drill. 
 
I hope the winter season has brought you as much joy as it has brought me.  There have been challenges but I always seem to find relaxation, inspiration and laughter through my sewing and especially my online sewing friends.  I am very excited to get together with several of you at The Stash Bash in April!
 
Chris


Friday, November 2, 2012

The Stash Bash Registration is Open!

Visit www.thestashbash.com or click directly on the registration button below for more information.  Come join us!

Thursday, October 25, 2012

The Stash Bash!

Announcing The Stash Bash Sewing and Quilting Retreat April 11-14, 2013 at the Calvin Center in Atlanta, GA!

As usual, I am on a complete high following an amazing Sewing Summit trip.  Getting together in real life with my online sewing friends is like a dream come true.  The only huge disappointment of the weekend was my own lack of energy to stay up all hours in the open sewing room laughing with all of my friends getting work done.  You know what I really want in addition to my annual beloved Sewing Summit?  A weekend where I can hang out with my tweeple, make a dent in my WIPs, and not worry about where I need to be when or what to wear.  Oh, and also it can't take too much out of my stash-building fabric-loving budget.

Enter The Stash Bash.  Now why in the world would I want to plan an event when I have a perfectly busy job raising three kids and trying to longarm quilt for my clients?  Well, I love to plan events and bring people together.

Before becoming an at-home mom and longarm quilter, I was a corporate event manager.  The last job I had in the industry was as the global Corporate Trade Show Manager for UPS.  I am a people person and I would much rather be on a busy trade show floor than in a cubicle.  I loved spending my work days traveling around the country talking to people about our products and technology.  I loved flying through the airports and being around the hustle and bustle of all of those busy people.  Even as a SAHM I have been involved in event planning and bringing people together.  I am entering my seventh year of captaining a women's tennis team, and I help plan girls' retreats in the mountains twice a year for this beloved group of crazies.

The mission of The Stash Bash is to provide an affordable sewing retreat where we can come together, spread out our projects and enjoy working alongside each other.  I envision a relaxed weekend where everything is already paid for, there are other stitchers and quilters on hand to answer any questions or give advice while you're working, and you can enjoy the mild Georgia weather with a walk around the lake or a nap in the sun.  There will be giveaways, optional games, and lots of laughs.  The event facility has kitchenettes, lots of common areas in addition to the main sewing room, and is only 20 minutes from Georgia's largest quilt shop A Scarlet Thread.

Atlanta boasts the busiest airport in the world.  There are direct flights from almost everywhere!  Atlanta is also the crossroads of interstates 75, 85 and 20.  Hopefully you can find an inexpensive flight or are lucky enough to live within easy driving distance.

I would love for you to consider attending The Stash Bash.  Getting you guys out of my phone and into my immediate presence would be the greatest gift!  Please let me know if you have any questions or suggestions.  Registration for The Stash Bash will open next Friday, Nov 2 at noon EST.  Please visit www.thestashbash.com for more information.  Spread the word with your favorite fabric-stash friends.  Hope to see you in April!

Chris


Friday, October 19, 2012

How To Customize An Ikea Table For Your Sewing Machine

Hi everyone.  This post is long-overdue!  I have promised many people a post on how we (ahem, my DH) took a $99 Ikea table and turned it into a customized sewing machine table.  Unfortunately, we didn't photograph the process, but I have taken lots of pics of the finished product so that I can try to describe it to you in detail.

Essentially, we bought a basic Ikea table (I think it is this one).  Then we bought a piece of unfinished hardwood that's about 3/4" thick and two pieces of 2"x3" (? maybe it's a 2x4 and I'm an idiot?).  Look in the scrap bin at your Home Depot because it really won't be seen.

The first thing I did was take off my accessory caddy and place my machine onto a large piece of paper.  Then, from straight above, I traced a pencil outline onto the paper.  I cut out the outline so that I basically had a paper footprint of my machine. 

At this point you need to think through how you will get your machine INTO it's hole.  Some machines have funky architectural aspects.  Mine, for instance, has a sloping sewing surface as well as a base that is bigger than the sewing surface level.  Because of this, I made my shape have a larger open right side so that I could slide my machine into it's slot.  This will make sense later in the post.

Lay your footprint paper onto the table surface and move it around to find the spot that works best for you.  Take into consideration how far back you like the machine from the front edge of the table, how much table space you prefer on the right vs the left of your machine, etc.  Once it's in the right spot, tape it down and trace a line around it onto the table surface.

Now the cutting begins!  Remember that it is very ok to cut your hole too small, but it is NOT OK to cut it too big.  Start by making a hole in the middle of your space with either a very large drill bit or a hole bit.  Then you can jigsaw out to your line and around your line until your footprint falls down.  Don't think about finishing this edge just yet!  There will probably be lots of trial and error before the final edge shape is ready to be smoothed with sandpaper.

At this point, slide or place your machine into the spot to see how it works.  Use a pencil to sketch onto the table where you need to cut or shave some more off.  Keep tweaking until you achieve the right hole.  Here is my machine footprint opening:


Next you need to build the shelf that will hold your machine.  Cut the 2x3's into two lengths that go from inside the front Ikea table skirt to inside the back skirt.  So when looking at the table from the front, these pieces are like rails that run from front to back under the table.  You can see the side of one below:


And a view from underneath shows it running parallel to the Ikea table's own support 1x1.  These 2x3's will be bolted in to the front and back skirts.


Once those are in, you will use screws with wing nuts to attach the machine shelf.  The reason we do it this way is so that you can use the wing nuts to adjust the height of the machine shelf to give you a perfectly smooth sewing surface:


Views from underneath:


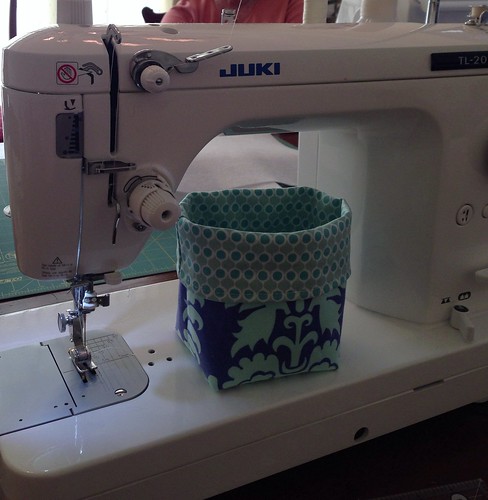
Now, put your machine on the table:


Remove the accessory box:


And slide the machine into it's spot:


Et voila!


Now you are able to run your pedal cord and power cords underneath the table and out through the opening in the back of the shelf:


Your sewing surface is level and your cords are off the table!


I keep a stone jar of pens, pencils, seam ripper, seam guides, etc in the nook to the right of the machine.  This is also where I keep my accessory box with all of my presser feet and needles.


I'm sorry this is not really a useful tutorial.  I just wanted to illustrate how a $100 table can become a nice, sturdy sewing table customized to your own machine bed.  This was done in one night and one morning.  Let me know if you have any questions!  Thanks.
 
Chris
 
(BTW, the machine AND table in this post are available for sale right now.  The Viking Sapphire 870Q is $850 and the table is $150.  I am north of Atlanta, GA.)