Showing posts with label Connecting Threads. Show all posts

Friday, March 4, 2011

100th Post and a Fat Quarter Bundle Giveaway!

I started a post today to show you my finished Fig Tree quilt when I noticed it would be my 100th post.  Well, that deserves a party doesn't it?!  So, I've decided to put one of my lovely but neglected FAT QUARTER BUNDLES up for adoption!  I have too many current and future WIPs that won't allow me time to get to this great fabric soon enough.

One lucky winner will receive 19 FQs (did I get 20 and one of them escaped?  I have no idea.) of the fabric line Riviera by Connecting Threads.  This is not a sponsored post, I just like them :-)  This fabric feels very nice and has wonderful modern colors in it.  Many of you have mentioned wanting to try Connecting Threads so here is your chance!  They also make popular quilting thread at very good prices and I can tell you from personal experience they have great customer service.

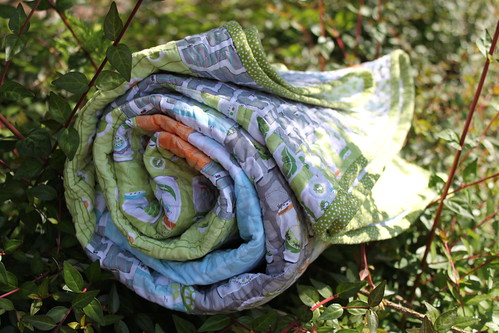
Here is the fabric porn you're looking for:


oooo, ahhhh, yummmm.

Now, what were we talking about?  Oh, yeah, the giveaway.  It's a jump-through-hoops one because I could use some more love around here :-)
1) One entry for a comment about your current WIP (work in progress) or a dream WIP.
2) One entry for becoming a Follower/Subscriber here at Frecklemama.com.
3) One entry for becoming a Follower on Twitter (@frecklemama).

For each entry, please leave a separate comment.  If you're already a follower or a friend just let me know.  I will leave the giveaway open for a week and draw a winner next Friday, 3/11.

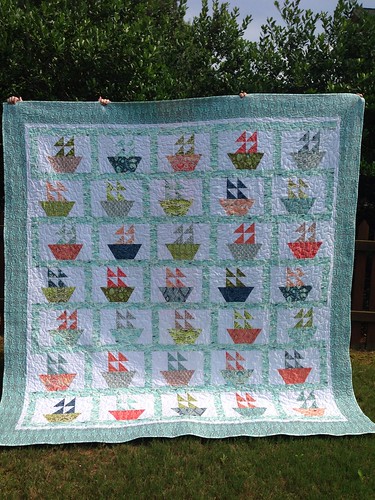
In the meantime, I'll get my Fig Tree quilt pictures ready and post them soon.  Talk about eye-candy...


*** NOTE:  Wonder why you seem to never win blog giveaways?  You may be a No-Reply blogger without realizing it!  To find out more about this please go HERE.

Friday, February 4, 2011

Basting and Quilting Fig Tree Fresh Cottons Quilt

My first target of the February Finish challenge is my Fig Tree Cherry Delight Quilt made with the Fresh Cottons line.  I bought this as a kit.  I love anything Fig Tree and putting this quilt together has been a breeze.  Instead of adding cherries to the center block, I added circles and a flower.  So it's more of a Fresh Cottons quilt than a Cherry Delight Quilt in my case.  Or maybe a Flowers Delight.

In this case, the top and back were already pieced and ready to go.  I needed to start this week by basting it.  Ugh, I hate basting.  Luckily, I have a nice, big area of bare hardwood floor in my foyer that works very well for basting.  It's well lit by natural light, there is no furniture to move, and I can easily move around all four sides.  Also, we don't use the front door that much so it isn't an area of heavy traffic.

First I use painter's tape to tape down the backing:
Please notice that I blatantly break the quilt police rule of trimming off the selvage edge when piecing the backing.  I don't do it.  And so far in making, washing and using qulits, I haven't noticed a difference.  Please feel free to chime in here and give me some good reasons to change my routine.  I'm open to criticism.
I guess one reason would be to have all of that lovely selvage to make selvage projects with! 

For this quilt I decided to try double layers of batting.  I'm not entirely pleased with how thin my quilts are.  I use Warm & White cotton batting.  I like it and it's very easy to use.  I just wish the quilts were a little more substantial.  Heavier and thicker but not poofy like with a high-loft polyester batting.  I would love any input about how to achieve these results.  I've looked around online and someone recommended just doubling up the batting.  So here goes.  After carefully laying and smoothing out the two layers of Warm & White, I add the quilt top:

Yes, the sides are a bit wobbly.  I'm ok with that.  I can always square it off before binding.

Next I take it to the machine for quilting.  Because I want this quilt DONE, I choose a very simple quilting plan of quilting down the center of each strip.  This will form concentric squares on the quilt back which will mimic the design on the front.
I just eyeball the center and let er rip.  I'm using the walking foot and my machine's needle down feature.  When I get to the point of needing to make my 90 degree turn, I just stop, pivot, and continue.  Easy peasy.  I'm using a Shmetz quilting needle and Connecting Threads thread in a nice light peach color.  I really like the way this thread looks in the finished quilting stitch.  It looks cottony, if that makes sense.  And it doesn't end up looking too thin like piecing thread or embroidery thread. 

After an evening of finishing up the quilting, I unfurl the quilt to admire my work and see at little mistake.  See post below for that story.  Next steps, binding, washing and photographing finished quilt.  Only two days left to get this one finished for the February Finish Challenge!